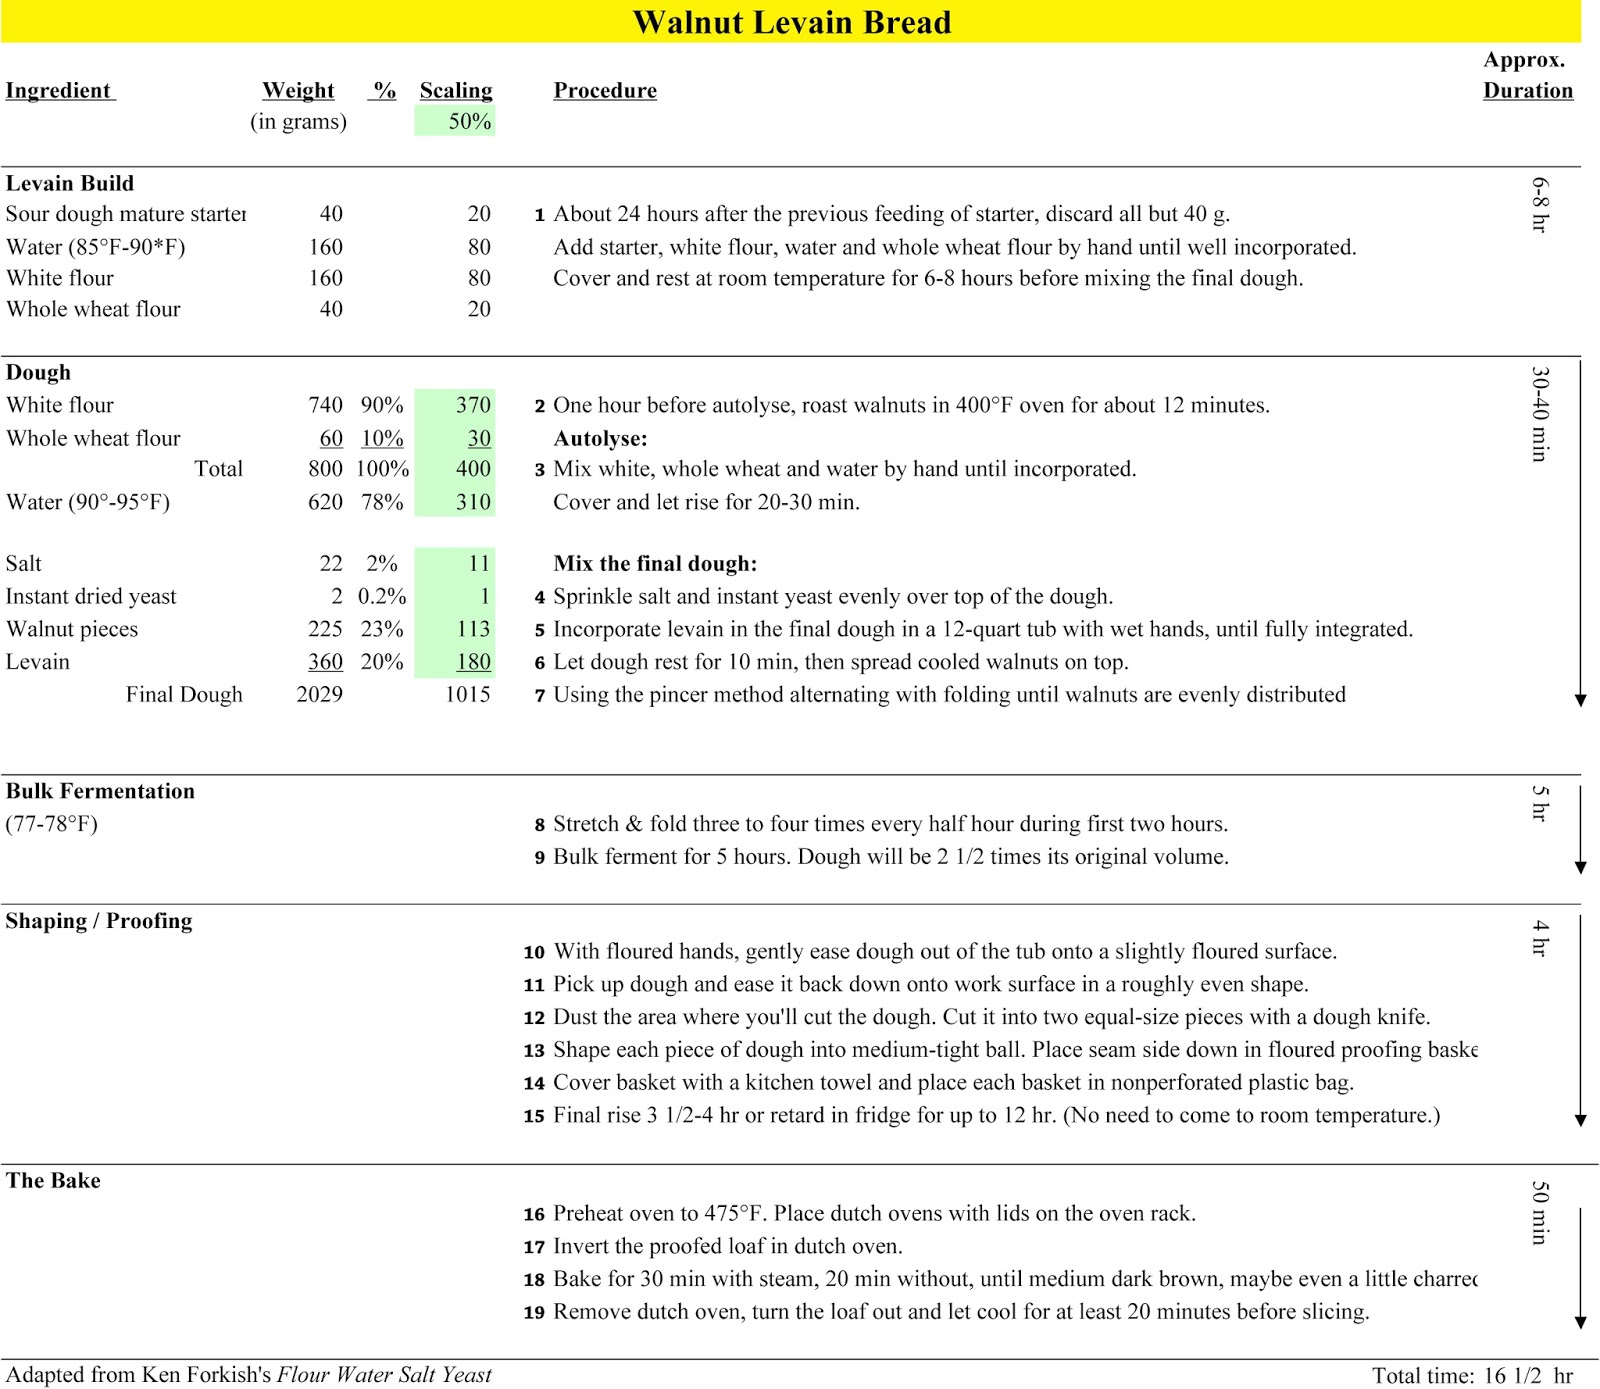


This article is from The Perfect Loaf. I did not write this. I wanted to grab it for later reference and share with my friends.
- July 30, 2018
- • 17 min read
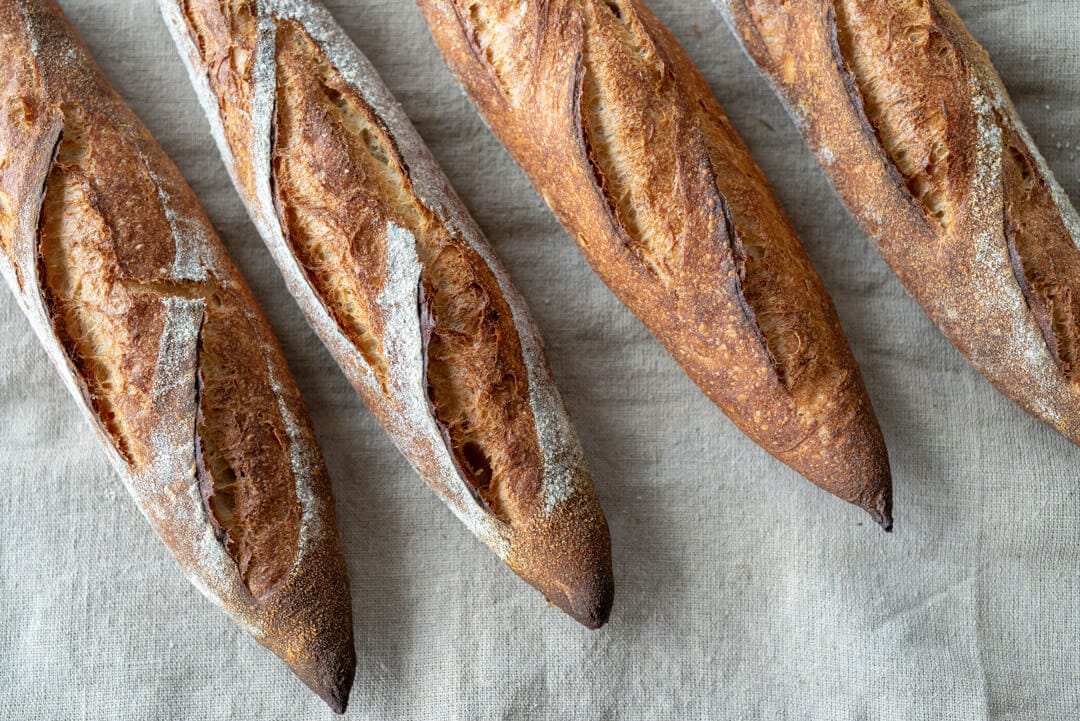
I’ve fallen hard for these pointy sticks. Their beautifully exaggerated shape starts with a thick center and transitions into dangerously sharp instruments at the ends. Colors stretching from the periphery of black to almost-too-light; contrast that elicits stares. A creamy and tender interior that’s so porous it soaks the butter inevitably spread thick during moments of eager anticipation. Pure sourdough baguettes are a tricky thing, I think, but when everything lines up just right all your past shortcomings discovered in testing vanish in an instant. All the trials and tests and tweaks fade away, leaving only a sense of accomplishment — that feeling of satisfaction that only comes when expectation and end result align.
These beautiful baguettes do take concerted effort and practice but the results are absolutely worth the work. Ok, technically these are demi-baguettes given their shorter stature and perhaps reduced dough weight, but the nature of this bread holds to the ideal. The slender shape, thin-crust, and delicate interior simply exude baguette, even if their specs are a little skewed.
I’ve been working on this recipe relentlessly, and if you follow me on Instagram you know this, but all the work put into these revolves around the simple fact baguettes are just plain challenging. I find that beyond the required fermentation attention, flour selection, hydration adjustments, cold versus warm bulk decisions, and seeking that correct proof point, there’s the matter of coercing the dough delicately into the correct shape. As with many things, they simply require practice.
Their challenge stems from the fact that even small shaping mishaps will show themselves quite clearly in the end result. There’s a reason why many bakers consider baguettes to be one of the hardest breads to make… A benchmark of sorts. But even if the shape or the interior isn’t exactly perfect, they’re always delicious and incredibly rewarding to make. Plus, the more you make them, the more the process slows down internally, the more all the small adjustments add up to large improvements.
Because shaping these sourdough baguettes can be frustrating at times, I’ve written an entire guide to shaping baguettes—complete with a video (which is also included below) to help illustrate things in real-time. I plan to flesh the guide out even further with alternate shaping methods as I experiment and work at these into the future. But as-is, the guide is a concise reference point for shaping sourdough baguettes.
Let’s talk about flour.
Flour Selection
In my early iterations of this formula, I worked in 10% white spelt flour (that’s spelt flour that has some percentage of bran/germ sifted out). My intention was to introduce more extensibility in the dough along with the classic, and wonderful, flavor of spelt. After many trials I decided to drop the spelt due to a few reasons:
- at 73% hydration, this dough had plenty of extensibility
- while whole grain spelt flour has an amazing flavor, 10% white spelt just didn’t contribute enough to the end result
- white spelt flour can be hard to obtain
In the end, I substituted out the spelt for a higher protein white flour (in this case Central Milling High Mountain, 13% protein). This formula could easily be adapted to be 100% lower-protein white flour, omitting the high protein flour entirely. If you take this path, know that the dough might be a little more extensible and sticky, potentially requiring a longer mix time.
Sourdough Baguettes
Similar to my Kamut demi-baguette recipe, I utilized a short warm, and long cold, two-step bulk fermentation for this dough. When I tested cold proofing these baguettes in shape the results always yielded a slightly thicker crust compared to a warm final proof. Further, a cold bulk also adds to the flexibility and convenience of this dough.
This flexible dough can be warm-bulked for same-day baguettes or cold-bulked overnight for baguettes fresh the next day.
The entire process is split up over the course of two days. This affords you the option to bake the baguettes the next day when you want them — for breakfast, lunch, or even dinner.
Vitals
The following sourdough baguette formula results in 6 demi-baguettes. I baked these in two batches of three in my home oven. When baking the first three, the remaining three were rested in the fridge on a proofing board.
| Total Dough Weight | 2100 grams |
| Pre-fermented Flour | 4.00% |
| Hydration | 73.00% |
| Yield | 6 x 350g sourdough baguettes (appx 14″ long) |
Total Formula
This is a roll-up of the entire formula for this dough. Read on to see the levain and the dough mix broken out into two separate tables.
Note: Going forward this will be how I list dough formulas here to help avoid confusion. The Total Formula table below shows a snapshot of the overall percentages of each ingredient, their weights, and a description of the flour. Each subsequent table (Levain, Dough Mix) shows only what you need to mix for that component (Levain and Dough Mix), independently.
For an in-depth explanation on how I use Baker’s Percentages below, see my beginner’s sourdough post.
| Weight | Ingredient | Baker’s Percentage |
|---|---|---|
| 1056g | White bread flour, malted (Giusto’s Artisan Bread Flour, ~11.5% protein) | 90.00% |
| 117g | High protein bread flour (Central Milling High Mountain, ~13% protein) | 10.00% |
| 856g | Water | 73.00% |
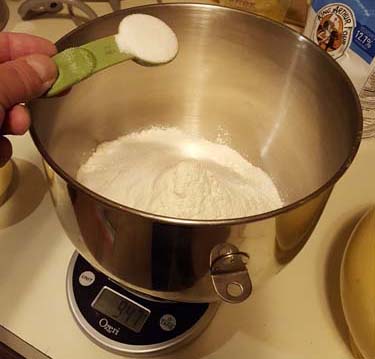
| 24g | Salt | 2.00% |
| 47g | Starter (100% hydration) | 4.00% |
Levain (liquid & mild)
One of my goals with these sourdough baguettes was to keep the flavor profile mild and just-barely-sour. Utilizing all white flour in the levain, high hydration, and using it before it becomes overly ripe all ensure acidity is kept low. These properties eventually transfer over to the final dough itself. See my discussion on what a levain is and how to adjust the flavor profile for more information.
| Weight | Ingredient | Baker’s Percentage |
|---|---|---|
| 47g | Mature liquid starter (100% hydration) | 100% |
| 47g | White bread flour, malted (Giusto’s Artisan Bread Flour, 11.5% protein) | 100% |
| 47g | Water | 100% |
This is a fast levain build: we go from feeding to maturity in only 3 hours. The high inoculation percentage and warm temperature expedite the maturation of this levain. If you’d like to stretch this time out a bit, to better fit your schedule, drop the inoculation down to 50% mature starter and it’ll be ready in around 5-6 hours.
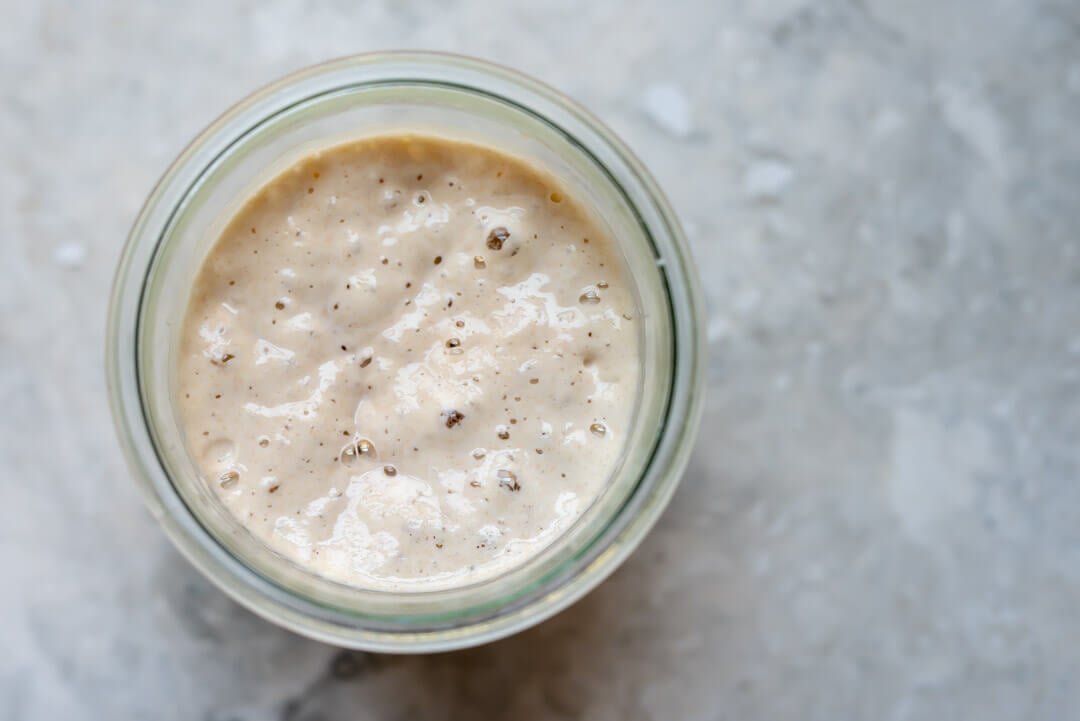
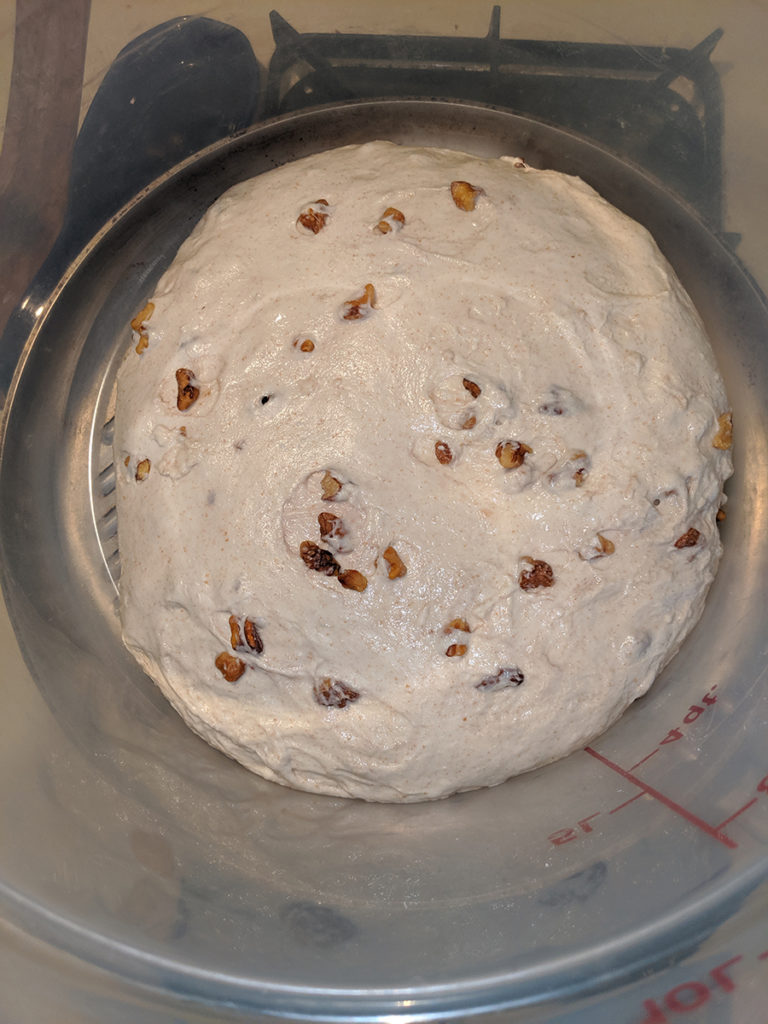
At 100% inoculation my levain was ready to be mixed into the dough after 3 hours when kept at 77-80°F (25-26°C).
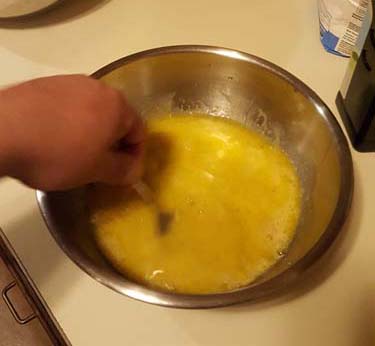
Above you can see a picture of my levain right before mixing it into my dough. Plenty of bubbles on top and the sides, and if you look closely, you’ll see it just starting to fall at the edges.
Dough Mix
The target final dough temperature (FDT) is 79°F (26°C).
Note that the table below shows the weights for the ingredients only for the final sourdough baguette dough mix. In other words, the weight of the flour here will be less than the Total Formula lists above because some flour needs to be used to build the levain, above.
| Weight | Ingredient |
|---|---|
| 1009g | White bread flour, malted (Giusto’s Artisan Bread Flour, ~11.5% protein) |
| 117g | High protein bread flour (Central Milling High Mountain, ~13% protein) |
| 810g | Water |
| 24g | Fine sea salt |
| 141g | Mature, but mild, liquid levain (see above) |
Method
1. Liquid Levain – 10:30 a.m.
Build the levain (everything listed in the Levain section, above) and store somewhere around 78°F (25°C) ambient until ripe, about 3 hours.
2. Autolyse – 12:45 p.m.
Add the called for flour, and all but 100g of the called for water to a mixing bowl. Mix by hand until fully incorporated. Cover the bowl and let autolyse for 1 hour.
See my guide to the autolyse technique for more information on its benefits and why I used it with these baguettes.
3. Mix – 1:45 p.m.
To the mixing bowl, add the liquid levain, salt, and the rest of the reserved water.
Mix in the bowl for 5-8 minutes until the dough starts to smooth out some. Alternatively, you could scoop the dough out to the counter and slap/fold (French fold) the dough until you see medium development (my preference and it took me about 5 minutes of mixing).
At the end of mixing, the dough won’t look incredibly smooth or firm; it’ll still look shaggy and feel slightly slack. Further strength will be imparted during bulk fermentation physically (through stretch and folds) and organically (through fermentation itself).
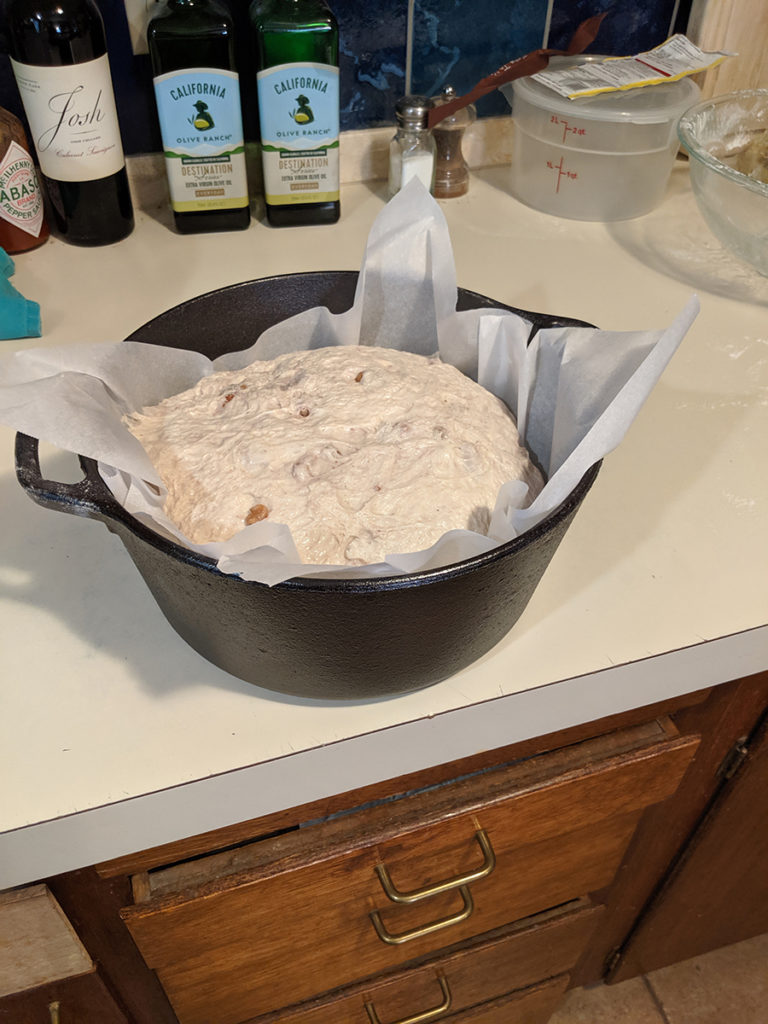
Transfer the dough to a tub or thick-walled bowl for bulk fermentation.
4. Warm Bulk Fermentation – 2:00 p.m. to 3:45 p.m.
During this phase (of the two-step bulk fermentation phase), give the dough three sets of stretch and folds, starting 30 minutes after the beginning of bulk (i.e., 2:30 p.m.). After the last set, let the dough rest untouched for 15 minutes.
This warm bulk fermentation will last a total of 1 hour and 45 minutes. The dough will clearly show signs of fermentation activity: it will be smoother and show some small bubbles on the surface.
5. Cold Bulk Fermentation – 3:45 p.m. to 11:00 a.m. (next day)
At this point, you can choose to cold-bulk the dough until the next day (as I do in this post) or continue to bulk ferment the dough on the counter for a same-day bake. Same-day baguettes tend to have an even more mild flavor profile. This pushes the flavor of the grain itself forward, resulting in reduced acidity and sourness.
If you choose to make same-day baguettes, proceed with bulk fermentation on the counter until the dough looks ready to divide, likely 1-1.5 hours more. Then, shape them and proof in the same way as described below.
If you choose to proceed with a cold bulk fermentation, place the covered bulk container into your fridge until the next day.
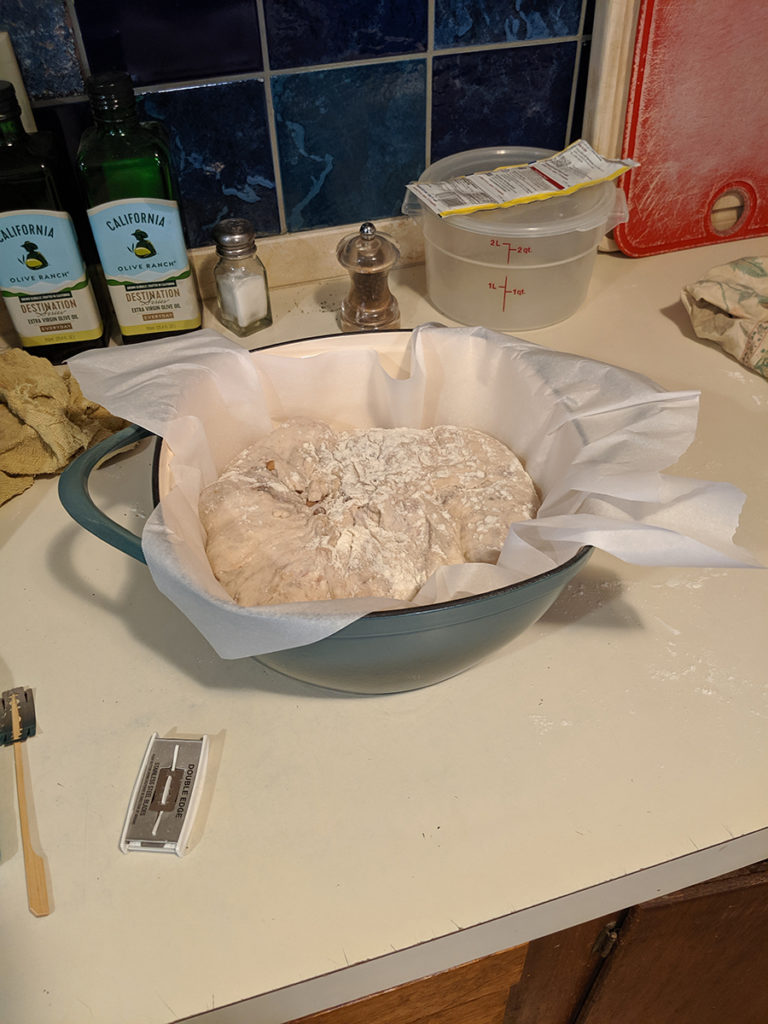
6. Divide & Preshape – 11:00 a.m. (next day)
I chose to remove the dough from the fridge at 11:00 a.m. the next day, but this time is very flexible. I’ve removed it a few hours early, and up to 5 hours later, and the results were equally great. As I said earlier, this dough is very flexible.
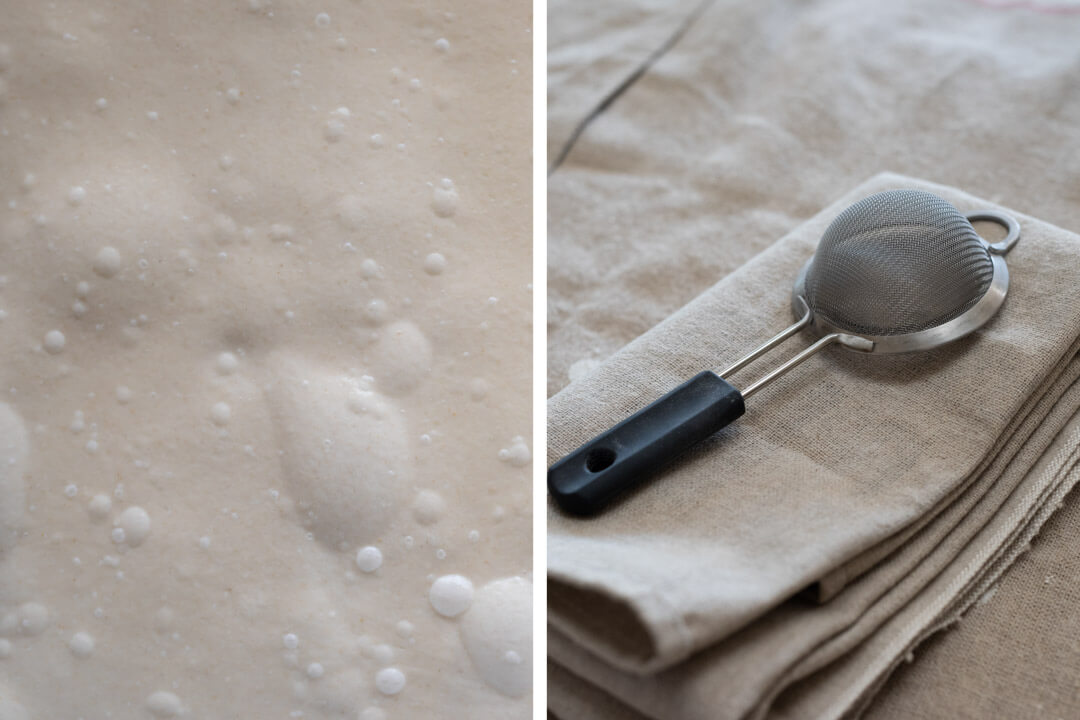
In the image above you can see the top of my cold-bulked dough right when pulled from the fridge. Plenty of activity, but not exceedingly gassy or risen. Relaxed and active.
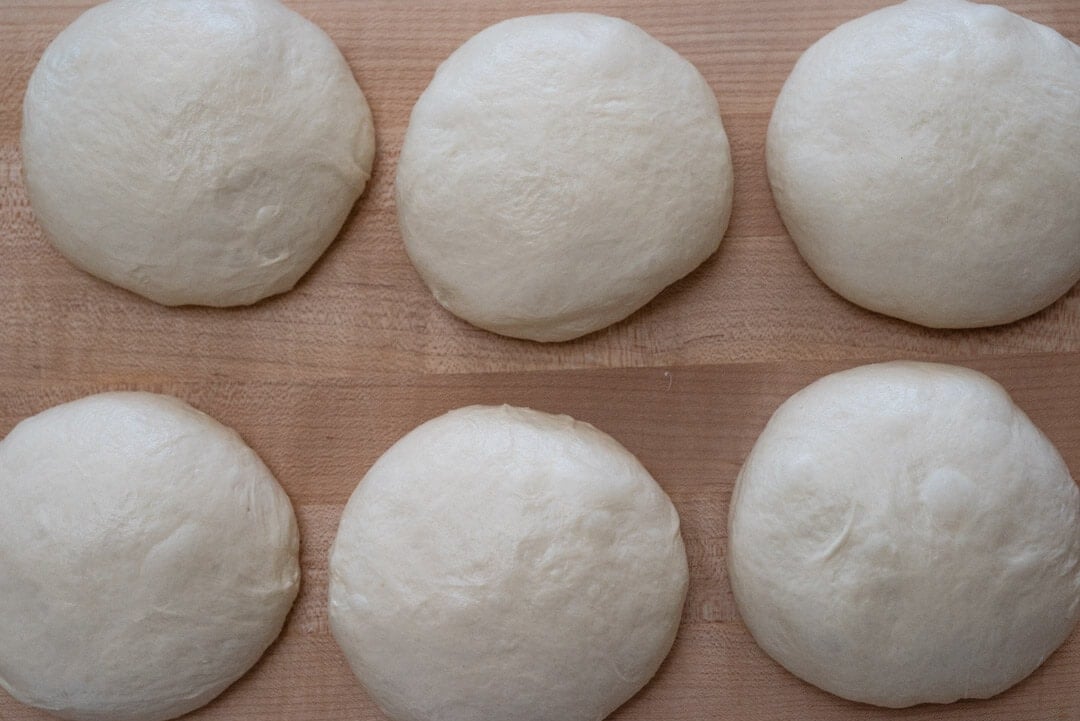
Gently scrape the dough from the bulk container to an un-floured work surface. The dough will feel cold, slightly damp, and firm. Divide into 350g pieces and preshape the pieces of dough into rounds (my preference) or rough tubes. Because the dough is cold and firm, very little bench flour is needed to pre-shape. Let the preshaped dough rest for 30 minutes, uncovered.
7. Shape – 11:30 a.m.
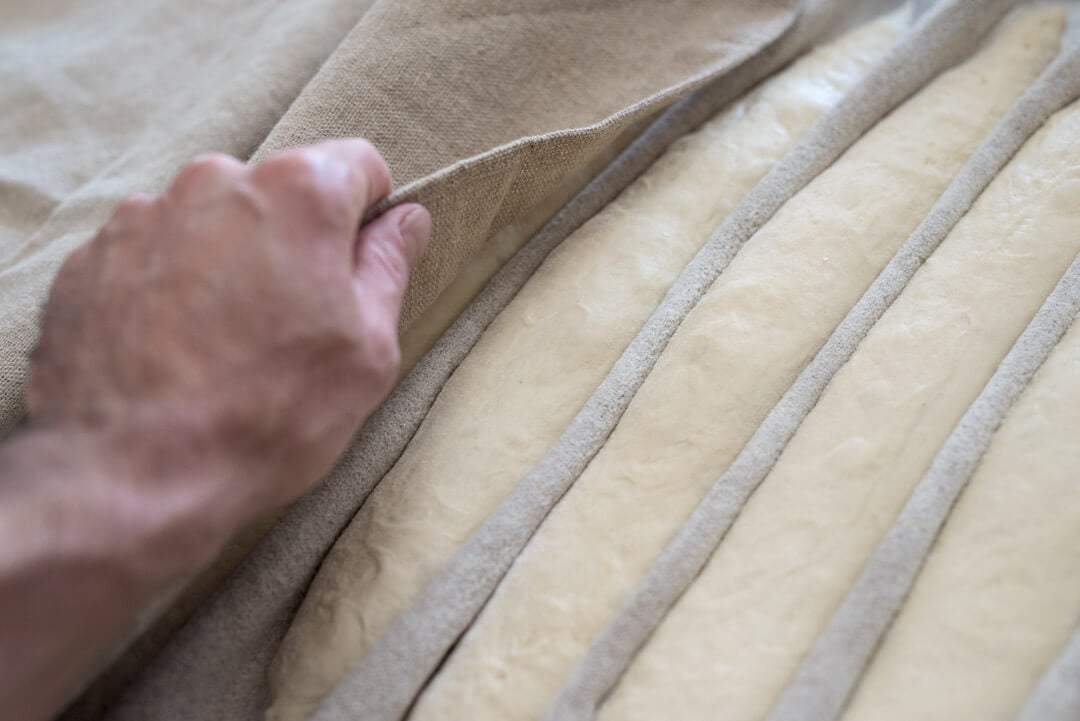
Prepare a board with a kitchen towel or proofing linen (couche) to proof your shaped baguettes. For further instruction on this, head over to my Kamut demi-baguette post to see pictures of my couche ready for dough.

After the preshaped rounds have rested 30 minutes, shape each piece into a long baguette, approximately 14″ long for a home oven.
Proof the pieces until they pass the poke test, about 1 hour and 45 minutes at room temperature. I shaped these baguettes in my typical way, as seen in the video to the side. For more in-depth information on shaping check out my guide to shaping sourdoughbaguettes.
Shaping baguettes are something that requires practice. Try not to get discouraged when shaping, take it slow and focus on one motion at a time.
8. Proof – 12:00 p.m. to 1:45 p.m.
Try to keep your proofing board away from drafts as the dough can quickly develop a crust on the outside. It may help to drape the edges of your linen over the shaped baguettes or cover them loosely with plastic. If you cover with plastic, be aware the dough may stick.
9. Bake – Preheat oven at 12:45 p.m., bake at 1:45 p.m.
Preheat your oven with baking stone/steel for one hour at 500°F (260°C).
One challenge with these baguettes is you’ll likely have to bake these in two batches. If you have two racks each with a baking stone (or Baking Steel), you could utilize both surfaces and bake all six simultaneously. My method is to break the bake up into two sessions: in the first, three are loaded and baked. Then, the remaining three baguettes are left on the couche, folded up gently, and placed into the refrigerator until it’s time to start the second baking session.
To start the first baking session, ready a pizza peel lined with parchment paper. I use one large piece to cover the entire peel, which is the same width as my baking surface.
Grab the right end of the couche and pull it out, moving the piece of dough away from the rest. Then, using a dough transfer board (a smaller pizza peel or a small cutting board could also work), place the board to the inside of the baguette (the side closest the rest of the dough pieces). With the hand holding the couche, quickly flip the dough onto the peel by tugging up and slightly over the transfer board. The baguette should now be seam side down on the transfer board.
Slide the dough off the transfer board and onto the prepared pizza peel with parchment paper, seam side down, and continue until you have three pieces.
Once all three baguettes are on the parchment paper, score each with three slashes. Each slash should be reasonably shallow to the dough, and the beginning of one should overlap about 20% of the previous.
Slide the parchment paper with dough onto your baking surface. Due to the smaller mass, these baguettes will take less time to bake than a large hearth loaf. Once you load the dough, steam the oven and turn it down to 475°F (246°C). Bake for 20 minutes with steam. Then, remove the pans used for steaming, vent the oven, and turn it down to 450°F (230°C). Bake for an additional 20-25 minutes until done.
Cool on a rack and repeat for the remaining three baguettes from the fridge.
I steamed my oven in my usual way, described here in my post on how to steam your home oven for baking.
Conclusion
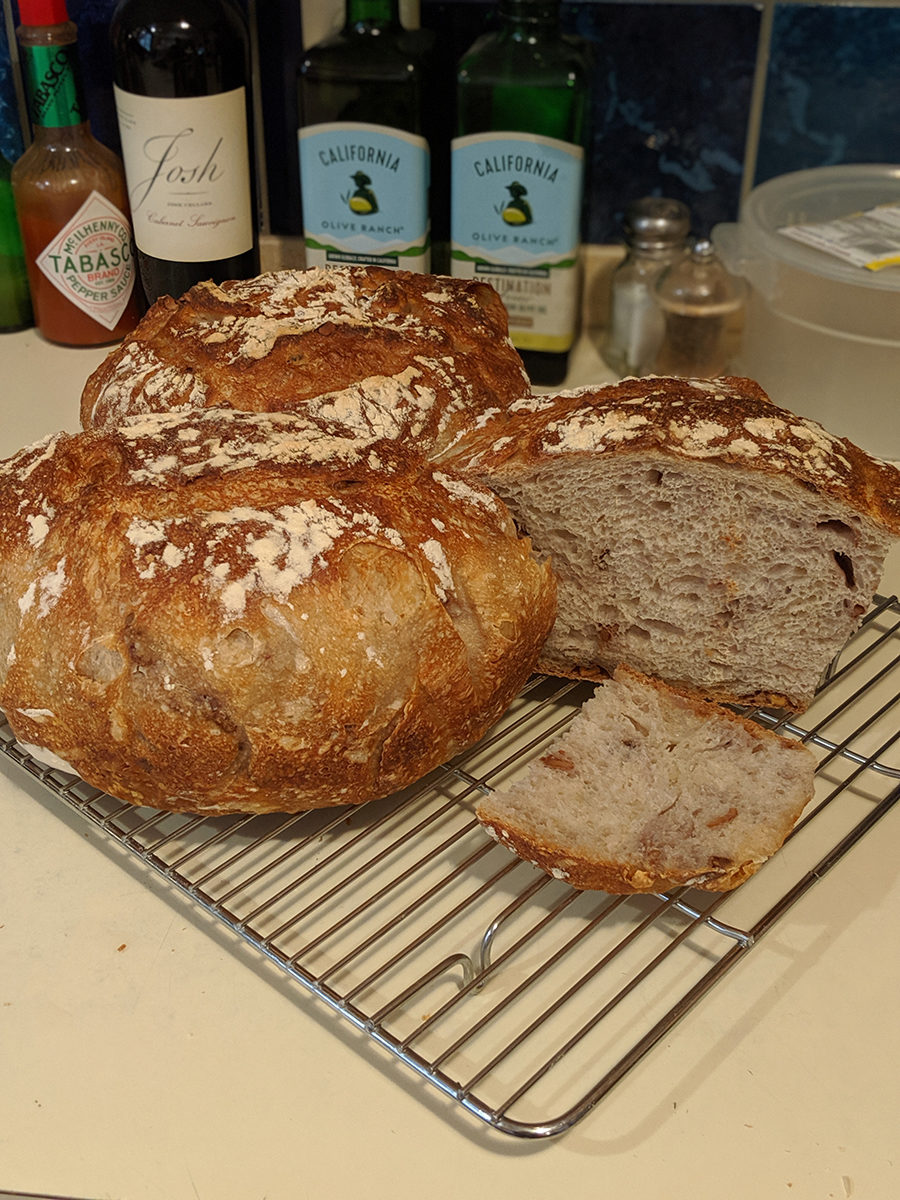
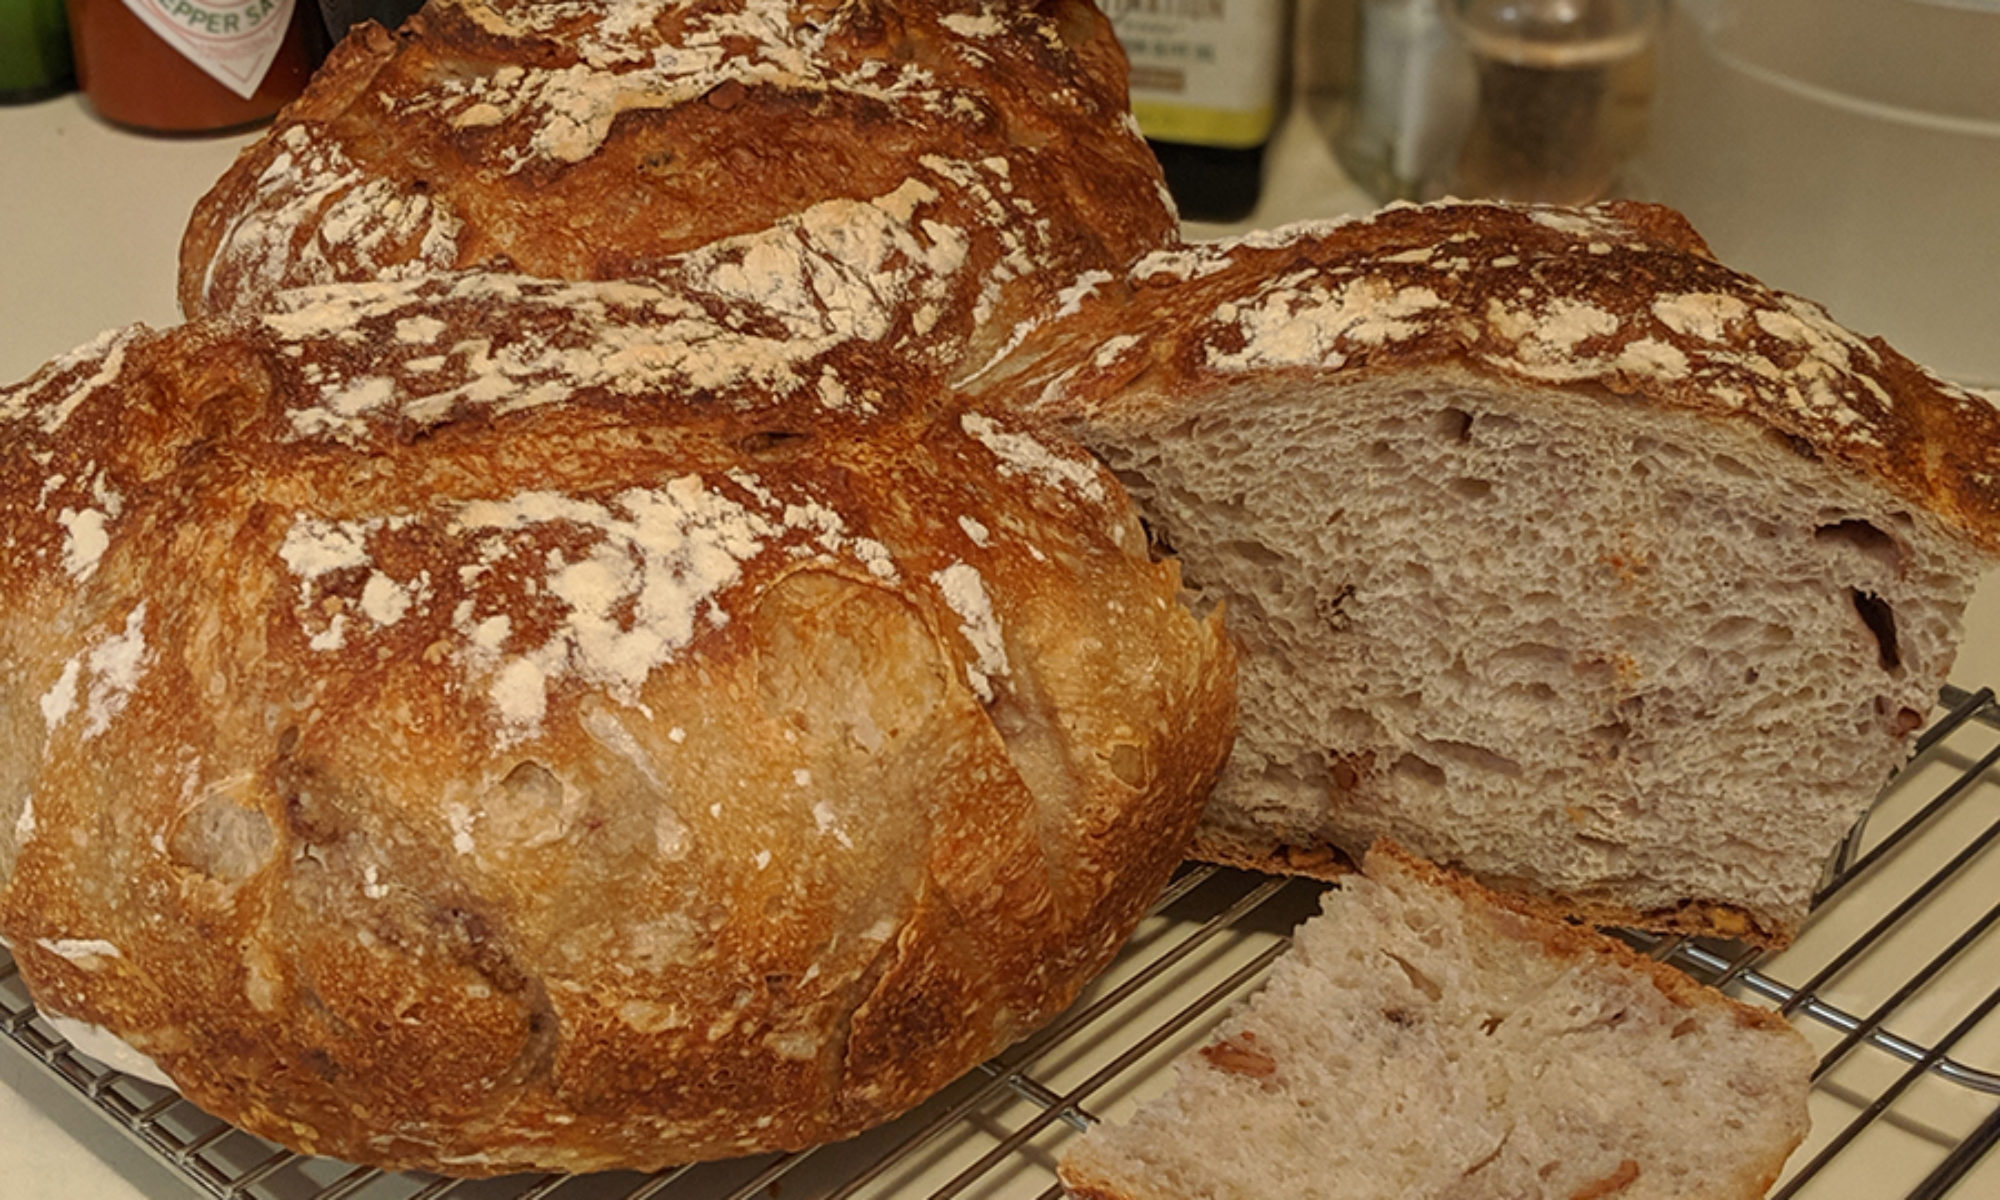
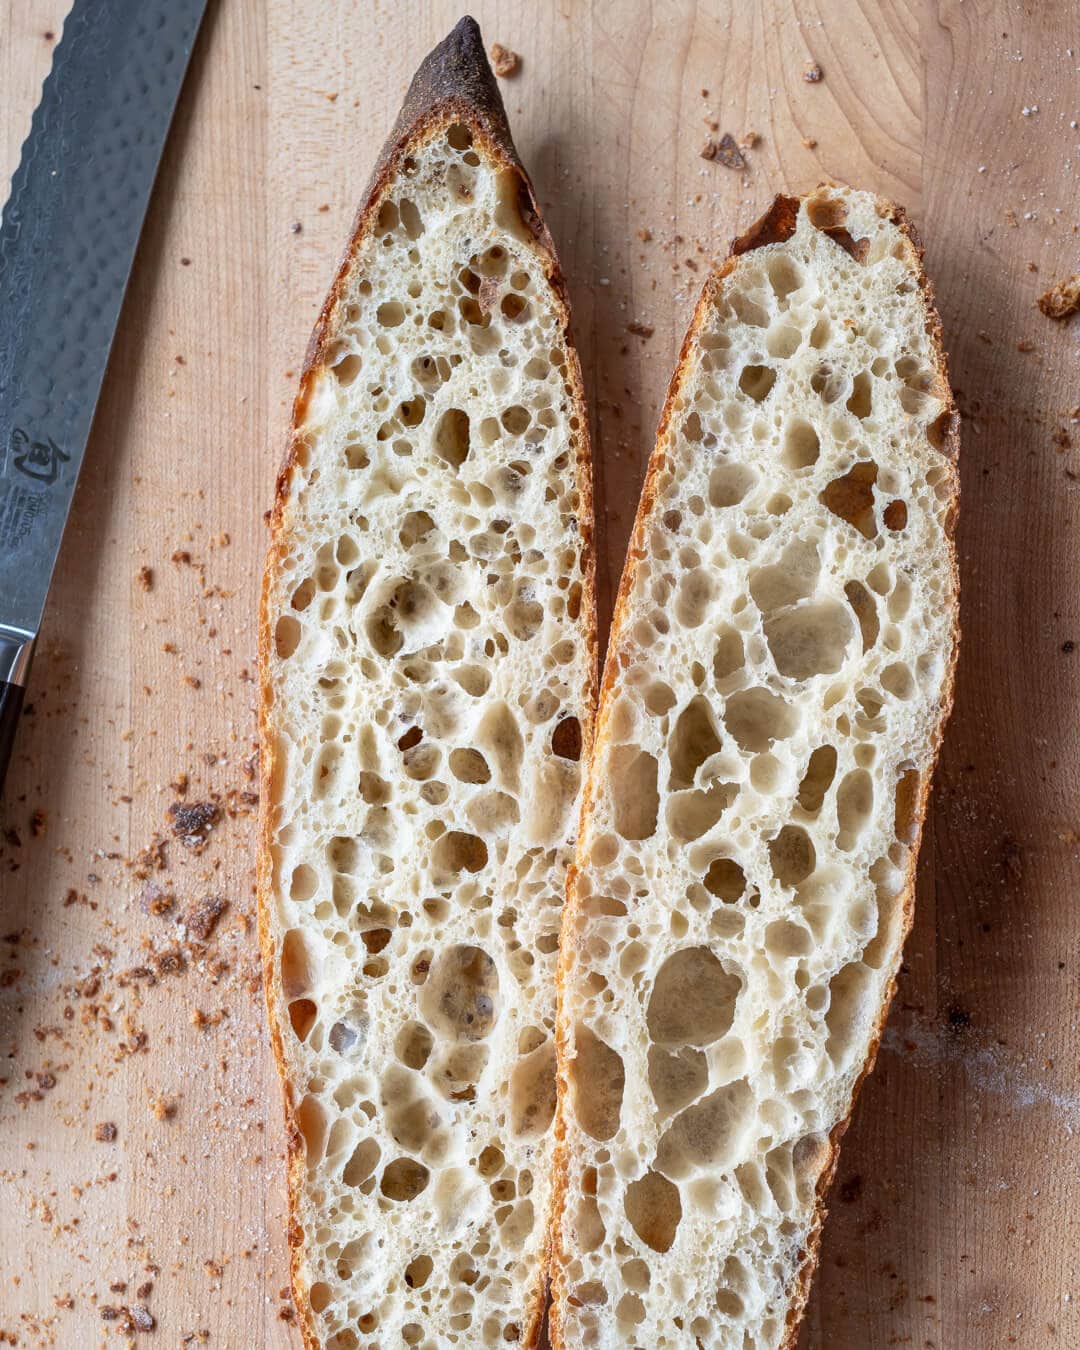
These sourdough baguettes taste rich, exquisite, delicate, and yet, they have an exposed rough side. The brittle crust grounds the eating experience and gives body to the otherwise tender bread. It’s through this contrast that the bread is elevated to the next level—a baguette with a soft, flimsy crust would be a sad baguette indeed.
The only downside to making these baguettes is also what makes them so unique: because of their small circumference and thin crust, they’re best eaten on the day you bake them. After the first day, they begin to lose their texture, and the crust either becomes overly hard (if in a dry climate) or soft (if in a humid environment). This puzzle is easily solved, however: invite your friends over, slice every baguette, and stand back as they’re gone before the end of the night.
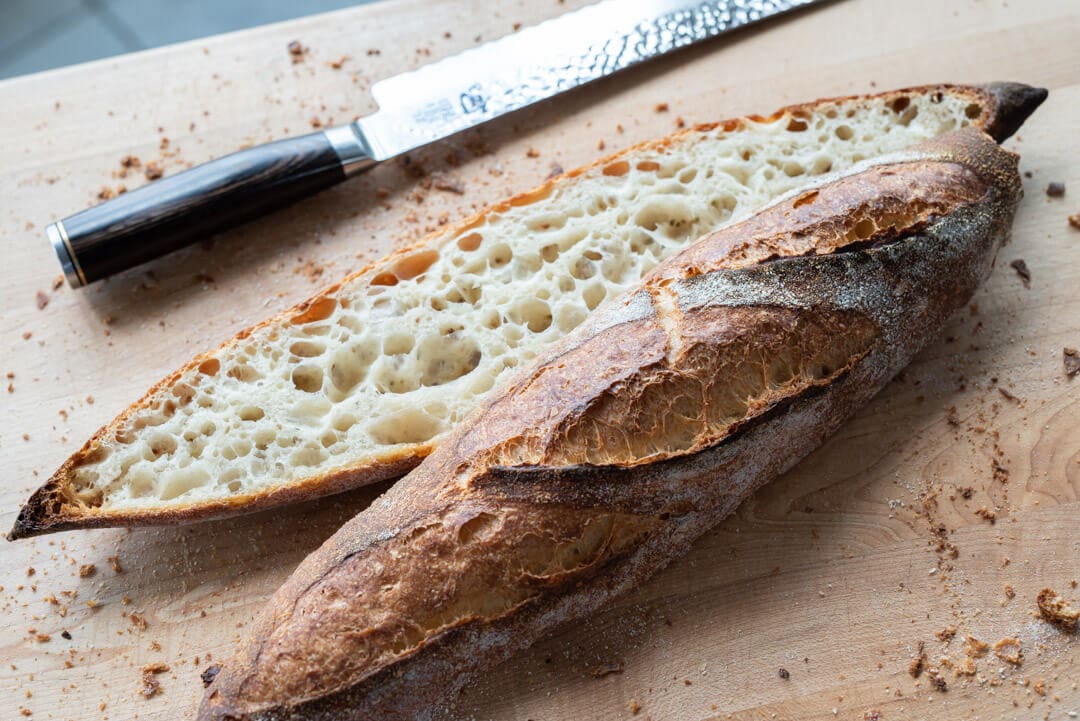
Crust
The golden, dark crust on these baguettes is just thick enough. Thick enough to provide great mouthfeel and structure, but not overly thick as to diminish one of the defining characteristics of a baguette itself. A commercially yeasted baguette may yield a thinner crust, but I dare say these come close. Plus, it’s hard to deny the exciting flavor from natural leavening and overnight proof.
Crumb
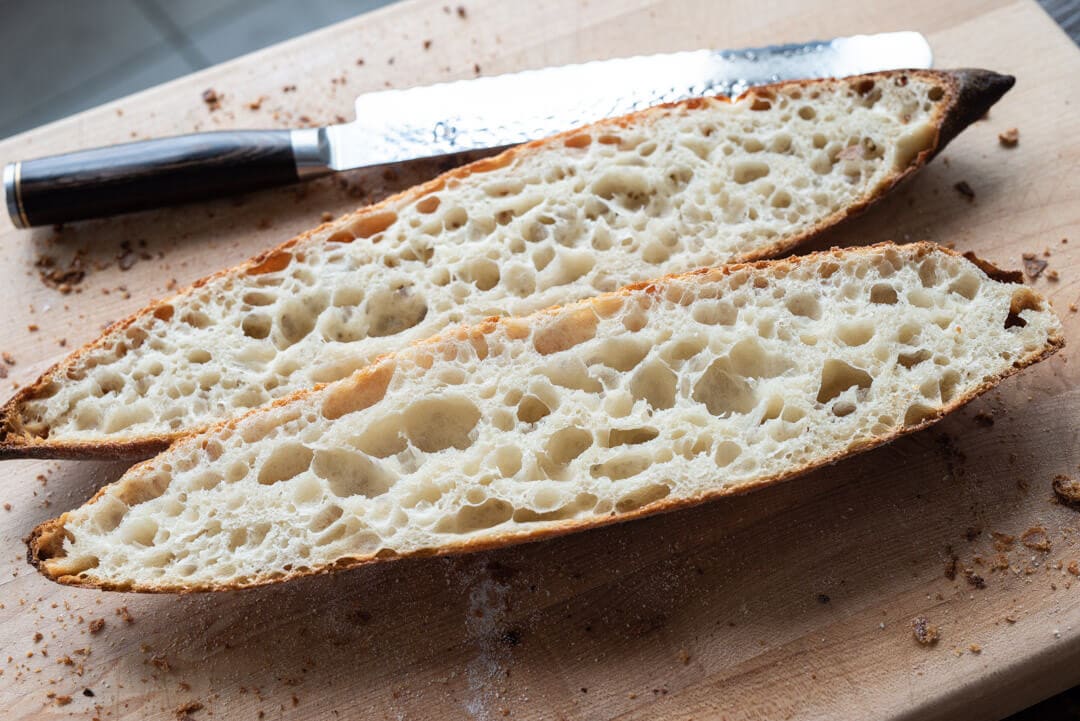
The interior is tender, open, and glossy. I love the contrast between the extremes: when cut the crust wants to shatter like a cracker, and the crumb wants to stretch and tear like cotton candy.
Taste
Even though they’re comprised of 100% white flour, they have depth and richness that seems to defy logic. These sourdough baguettes taste like they have a very light spread of butter even without a trace of the stuff. Perhaps it’s the supple texture of the interior playing tricks on me, maybe its the grain, or perhaps it’s the magic of sourdough and fermentation. Whatever the cause, I’ll take it.
I’ve said it before, and I’ll probably say it a million times more: fermentation is a mysterious and beautiful thing. I hope you try this recipe and you show up to your next gathering with an armful of exquisite, and incredibly delicious, pointy sticks.
Sourdough Baguettes Troubleshooting
Why are these scaled to 350g?
One (of the many) reasons I like to do a cold proof with almost all my other doughs is because scoring is much easier. When the dough is warm, it’s easy for your blade to drag and get stuck. The best advice I have here is to use a new, super sharp blade and make your cuts as smooth and fast as possible. If you notice you didn’t cut through the skin of the dough sufficiently in the first pass, lightly drag the blade inside the cut to give it a little help.